Showing posts with label treats. Show all posts

Friday, February 26, 2016

Leap Day Frog Treats


It's my daughter's turn to bring snack for school on Monday and because Monday is Leap Day we just HAD to do something extra special! This is what we came up with:


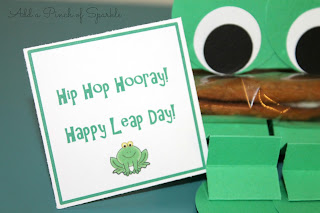
Oatmeal Creme Pie Frog Treats! They are so cute and so easy to make that I am SURE you want to make some yourself! Here's how we did it:


Supplies:
A 2" x 3" piece of green cardstock, folded in half
Two 1 3/4" green cardstock circles
Two 1" white cardstock circles
Two 3/4" black cardstock circles
Two 1" x 4" strips of green cardstock, accordion folded
Two 2" green cardstock ovals
1 Oatmeal Creme Pie (I used Little Debbie brand)
hot glue gun and glue sticks (not pictured)
*note* I used various sizes of paper punches to cut the circles and ovals


First, glue the 2" x 3" piece of cardstock to the oatmeal creme pie. 
*Hint* I glued it along the seam on the wrapper to help ensure the hot glue didn't melt through the plastic.


Next, glue the black, white and green circles together to form eyes and then attach them to the front of the green cardstock.


Finally, glue an oval to the bottom of each accordion folded strip and then attach the top of the strips to the bottom of the pie. 
*Hint* I put the glue on the cardstock first and let it cool for just a second before attaching it to the wrapper.


And that's it! An adorable frog treat!


Don't you just want to eat it up!?!


We made them in several different shades of green.


I also added a little tag that says:

Hip Hop Hooray!
Happy Leap Day!


My daughter is so excited to take these to school on Monday! How about you? Do you have any fun Leap Day treats or activities planned?

Wednesday, February 24, 2016

"Treat" Your Body Like A Temple {Includes Free Printables}


This month the Come, Follow Me topic for the Youth is The Plan of Salvation. As I was reading through the outlines for this month, I immediately had an idea for the lesson "Why should I treat my body like a temple?" found here.


I like to include a little something fun to eat with my handouts and it only took a minute to come up with a little play on words for the lesson:

My body is a "sweet" gift from Heavenly Father and I should "treat" it like a temple . . .


And it just so happens that Hershey's Miniatures are perfect building blocks for the temple as well as a "sweet treat"!


I made some candy bar wrappers and labeled each with a reason we should treat our body like a temple. I found the reasons from the lesson outline as well as a talk by Sister Susan W. Tanner. You can find her talk here.

When the handout was complete each block of the temple completed the sentence at the top of the handout: 

My body is a "sweet" gift from Heavenly Father and I should "treat" it like a temple . . .

. . . because my body is God's sacred creation!

 . . . because my body houses my spirit!

. . . and I will receive blessings!

. . . and if I live worthily my body can one day be sanctified and exalted!


I think that the handout turned out pretty cute!

You can view and download a copy of the handout here.

You can also view and download a copy of the candy bar wrappers here.

Enjoy!

Friday, February 19, 2016

Be a Defender of the Lord's Plan


This is a fun little treat I made to go with this month's Visiting Teaching message (found here). My inspiration came from this quote by Sister Bonnie L. Oscarson:

"Everyone, no matter what their marital circumstance or number of children, can be defenders of the Lord's plan described in the family proclamation. If it is the Lord's plan, it should also be our plan!"


When I thought about being a defender, I thought about the Book of Mormon and using a bow and arrow. It worked so perfectly that a bow is the same shape as the letter "D" so I was able to incorporate it into the phrase I added to the top of the handout:

"Be a Defender of the Lord's plan!"

To make the arrow I used a small wooden dowel I found at Hobby Lobby. I added some ribbon to the end and a chocolate heart for the arrowhead. It worked out great that Valentine's Day was this month and I had some chocolate hearts on hand, but you could also use a Hershey's Kiss for the arrowhead because it has the same triangle shape.


I think this will be a fun little treat to share with the sisters I visit!

Saturday, February 13, 2016

"Bee" My Love Bug Twinkie Valentine Tutorial


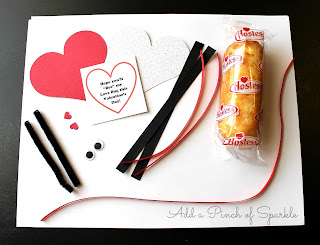
For an activity this week I put together these adorable Love Bug Twinkie Valentines. Here's a quick tutorial to show you how I did it!


Supplies:

A Twinkie
1 large red cardstock heart. I cut mine out with my Cricut.
1 large white cardstock heart (slightly smaller than the red one). I also cut this out with my Cricut and used some sparkly white cardstock.
2 small red cardstock hearts. I cut mine using a small heart paper punch.
2 googly eyes
Two 3" pieces of black pipe cleaner
Two 6" pieces of 3/8" width black ribbon
Two 6" pieces of 1/8" width red ribbon
Red ribbon and gift tag
Glue gun and glue sticks (not pictured)


Start by gluing one end of the black pieces of ribbon to the back of the Twinkie. Center a piece of red ribbon over the top of each black piece and glue in place.


Carefully wrap the ribbons around the Twinkie while keeping the red ribbon centered and glue in back.


Glue the pipe cleaners to the top of the Twinkie in a "V" shape. Glue the white heart to the back and add the red heart on top.


Turn the Twinkie over and add the googly eyes. Bend the tops of the pipe cleaners into little balls.


Glue the small red hearts to the top of the pipe cleaners.


And there you have it! A cute little Love Bug. I love how the Hostess logo has a heart that adds to the Valentine theme!


I added a little gift tag with some red ribbon. The tag reads:

Hope you'll "Bee" my Love Bug this Valentine's Day!

I love how these fun treats turned out. Almost too cute to eat. . . Almost!

Minion Twinkie Valentine Tutorial


My daughter and I made these cute little Minion Twinkie Valentines for her class party. They were so quick and easy I put together a tutorial so you can make some too!


You will need:

A Twinkie
A 2" x 4" rectangle of blue felt 
Two 3 1/2" pieces of blue ribbon
1-2 circles of gray cardstock. I cut mine using a 3/4" circle punch
1-2 plastic googly eyes
2 black buttons
A 6" piece of black ribbon
Black pipe cleaner
Small red cardstock heart. I cut mine using my Cricut
Small brown cardstock bear. I also cut this with my Cricut
Red ribbon and gift tag
Glue gun and glue sticks (not pictured)


First, wrap the blue felt around the bottom of the Twinkie and glue in place in the front and back.


Next, glue one of the blue ribbons to the front and back of the Twinkie to make an overall strap. Repeat on the other side.


Wrap the black ribbon around the top of the Twinkie and glue in place in back.


Glue the gray circles to the black ribbon and add the eyes on top. Cut a small piece of pipe cleaner and bend it into the shape of a smile then glue it in place. Add a black button to each overall strap. Glue the heart to the overalls. For Bob you can add the teddy bear.


Stewart only has one eye. Bend some small pieces of pipe cleaner and glue them to the top of the Twinkie for his hair.


You can make Kevin's hair by gluing a few pieces of straight pipe cleaner to the top of the Twinkie.


Add a gift tag with some red ribbon and you have a cute and tasty Valentine treat!

Wednesday, January 27, 2016

You Are An Important Piece Of The Puzzle

UPDATE (3/5/2017) You can now view and download the file for the puzzle gift tag. Scroll to the bottom of the post for the link!


This is a fun little gift tag/ handout I made inspired by this month's Visiting Teaching message (found here). I loved this quote by Sister Carole M. Stephen's:

" . . . We each belong to and are needed in the family of God."

This quote made me think of a puzzle, so I added a picture of some puzzle pieces and the words:

"You are an important PIECE of the PUZZLE!"

"Without YOU the Family of God is Not Complete!"


I found the puzzle piece ribbon at Walmart and used it to tie the tag to a bag of puzzle piece candy. I made the candy from vanilla almond bark mixed with some green, yellow, and blue food coloring and some red candy melts. I used this puzzle piece mold to shape the candy. I added some Rice Krispies cereal to the middle of the candy to give it a little crunch! My kids taste tested it for me and loved it!


I also thought it would be fun to attach the tag to a fun puzzle. Either one would be a cute little gift to give to the sisters you Visit Teach or anyone who you want to remind that they are important and loved!

UPDATE (3/5/2017) You can now view and download the file for the puzzle gift tag here! Enjoy!

Monday, March 16, 2015

Pot O' Gold Brownie Bites


I made these brownie bites a couple times last week and they were so easy and fun that I thought I would share!


For the pot I used a boxed brownie mix and baked up a bunch in a mini muffin tin. If you are feeling ambitious, you could also make the brownies from scratch! For the gold I used store-bought yellow frosting (again, you could also make your own). To add a little golden shimmer, I added some orange sugar sprinkles. Finally, to top it off, I added a candy rainbow. The rainbows are AirHeads Xtremes in Rainbow Berry flavor that I found in the candy aisle. I took one piece of the candy, cut it into thirds and it was the perfect size for the little brownie bite!


These are so easy and delicious, plus they're kid-approved!

Do you make any special treats for St. Patrick's Day?