Showing posts with label crafts. Show all posts

Friday, February 26, 2016

Leap Day Frog Treats


It's my daughter's turn to bring snack for school on Monday and because Monday is Leap Day we just HAD to do something extra special! This is what we came up with:


Oatmeal Creme Pie Frog Treats! They are so cute and so easy to make that I am SURE you want to make some yourself! Here's how we did it:


Supplies:
A 2" x 3" piece of green cardstock, folded in half
Two 1 3/4" green cardstock circles
Two 1" white cardstock circles
Two 3/4" black cardstock circles
Two 1" x 4" strips of green cardstock, accordion folded
Two 2" green cardstock ovals
1 Oatmeal Creme Pie (I used Little Debbie brand)
hot glue gun and glue sticks (not pictured)
*note* I used various sizes of paper punches to cut the circles and ovals


First, glue the 2" x 3" piece of cardstock to the oatmeal creme pie. 
*Hint* I glued it along the seam on the wrapper to help ensure the hot glue didn't melt through the plastic.


Next, glue the black, white and green circles together to form eyes and then attach them to the front of the green cardstock.


Finally, glue an oval to the bottom of each accordion folded strip and then attach the top of the strips to the bottom of the pie. 
*Hint* I put the glue on the cardstock first and let it cool for just a second before attaching it to the wrapper.


And that's it! An adorable frog treat!


Don't you just want to eat it up!?!


We made them in several different shades of green.


I also added a little tag that says:

Hip Hop Hooray!
Happy Leap Day!


My daughter is so excited to take these to school on Monday! How about you? Do you have any fun Leap Day treats or activities planned?

Saturday, February 13, 2016

"Bee" My Love Bug Twinkie Valentine Tutorial


For an activity this week I put together these adorable Love Bug Twinkie Valentines. Here's a quick tutorial to show you how I did it!


Supplies:

A Twinkie
1 large red cardstock heart. I cut mine out with my Cricut.
1 large white cardstock heart (slightly smaller than the red one). I also cut this out with my Cricut and used some sparkly white cardstock.
2 small red cardstock hearts. I cut mine using a small heart paper punch.
2 googly eyes
Two 3" pieces of black pipe cleaner
Two 6" pieces of 3/8" width black ribbon
Two 6" pieces of 1/8" width red ribbon
Red ribbon and gift tag
Glue gun and glue sticks (not pictured)


Start by gluing one end of the black pieces of ribbon to the back of the Twinkie. Center a piece of red ribbon over the top of each black piece and glue in place.


Carefully wrap the ribbons around the Twinkie while keeping the red ribbon centered and glue in back.


Glue the pipe cleaners to the top of the Twinkie in a "V" shape. Glue the white heart to the back and add the red heart on top.


Turn the Twinkie over and add the googly eyes. Bend the tops of the pipe cleaners into little balls.


Glue the small red hearts to the top of the pipe cleaners.


And there you have it! A cute little Love Bug. I love how the Hostess logo has a heart that adds to the Valentine theme!


I added a little gift tag with some red ribbon. The tag reads:

Hope you'll "Bee" my Love Bug this Valentine's Day!

I love how these fun treats turned out. Almost too cute to eat. . . Almost!

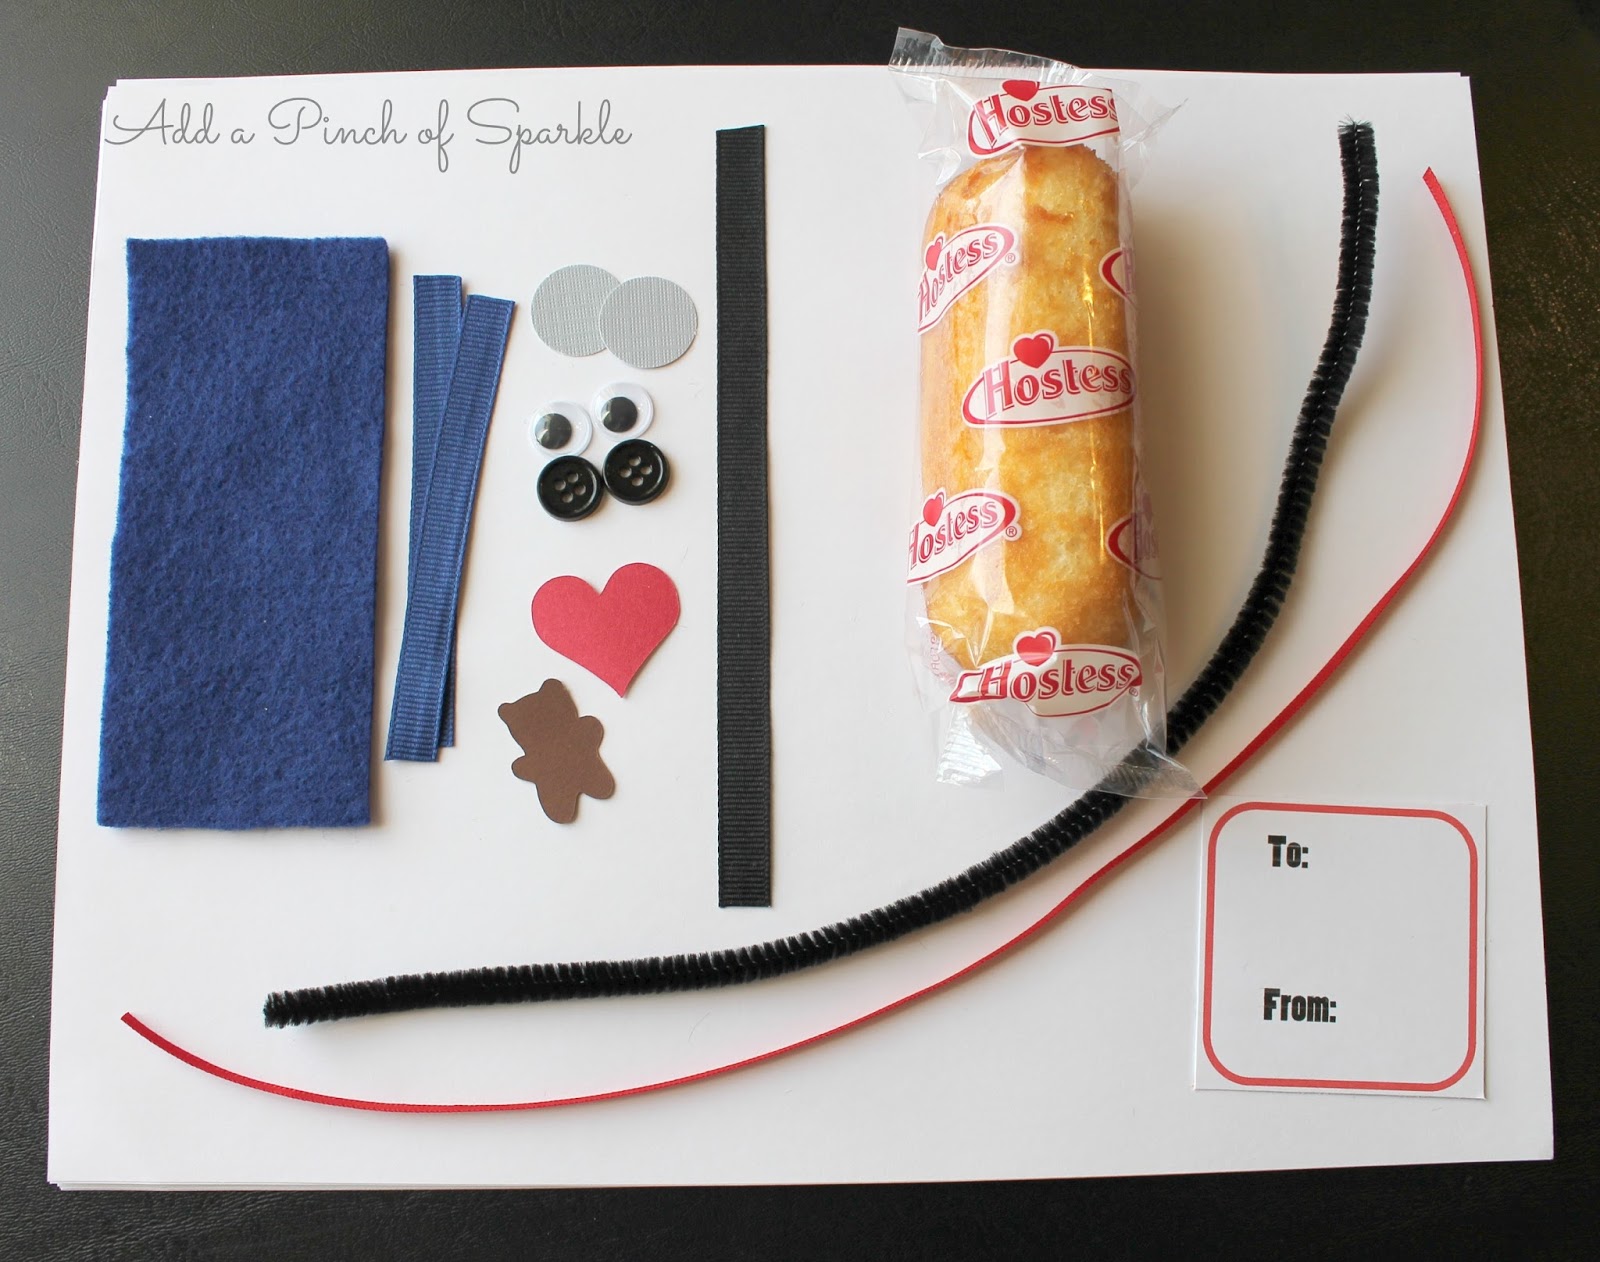
Minion Twinkie Valentine Tutorial


My daughter and I made these cute little Minion Twinkie Valentines for her class party. They were so quick and easy I put together a tutorial so you can make some too!


You will need:

A Twinkie
A 2" x 4" rectangle of blue felt 
Two 3 1/2" pieces of blue ribbon
1-2 circles of gray cardstock. I cut mine using a 3/4" circle punch
1-2 plastic googly eyes
2 black buttons
A 6" piece of black ribbon
Black pipe cleaner
Small red cardstock heart. I cut mine using my Cricut
Small brown cardstock bear. I also cut this with my Cricut
Red ribbon and gift tag
Glue gun and glue sticks (not pictured)


First, wrap the blue felt around the bottom of the Twinkie and glue in place in the front and back.


Next, glue one of the blue ribbons to the front and back of the Twinkie to make an overall strap. Repeat on the other side.


Wrap the black ribbon around the top of the Twinkie and glue in place in back.


Glue the gray circles to the black ribbon and add the eyes on top. Cut a small piece of pipe cleaner and bend it into the shape of a smile then glue it in place. Add a black button to each overall strap. Glue the heart to the overalls. For Bob you can add the teddy bear.


Stewart only has one eye. Bend some small pieces of pipe cleaner and glue them to the top of the Twinkie for his hair.


You can make Kevin's hair by gluing a few pieces of straight pipe cleaner to the top of the Twinkie.


Add a gift tag with some red ribbon and you have a cute and tasty Valentine treat!

Friday, February 12, 2016

Minion Valentine Boxes


My daughter needed to bring a decorated box to school to hold her Valentines and she requested that we decorate her box like a Minion. I only have one kid in school at this point, but the other kids were so excited about the Minion boxes that we had to make one for each of them as well. I think they turned out pretty cute.


This is Stewart. We started out with an empty box and covered it in yellow, blue, and black cardstock. We added some yellow arms, black hands, and blue overall straps with some white buttons.


This is Bob. His eyes are made from cardstock cut with varying sizes of circle paper punches. His teddy bear was cut with my Cricut using the Doodlecharms cartridge. The teddy bear's eyes are made of buttons. His heart was also cut with my Cricut using the Plantin SchoolBook cartridge.


This is Kevin. His hair and smile are made out of black pipe cleaners. I attached everything together using a glue gun.

These boxes were easy to put together and are 100% kid-approved!

Wednesday, November 11, 2015

Young Women in Excellence: Preserve Your Values


A couple years ago I was in charge of planning Young Women in Excellence for our Ward. I realized the other day that I never posted anything about it. Better late than never, so here are some pictures from that night!

The theme I came up with was "Preserve Your Values". Some of the definitions for "preserve" I found from the Merriam-Webster dictionary included, "to keep safe from injury, harm, or destruction: protect", "to keep alive, intact, or free from decay", "maintain", "to keep or save from decomposition". Not only does "preserve" refer to yummy foods, but it also has several definitions that tie in perfectly with what we teach/ are taught in Young Women- we want to PRESERVE our values! 

 I used mason jars and gingham print in a variety of colors to decorate for the night. 


The refreshments were Buttermilk Cupcakes in a Jar. These cute little cupcakes have a cream cheese frosting and are supposed to be served with preserves so they were perfect for the theme. Plus, they taste delicious! You can find the recipe here.


I printed off labels for the mason jars, tied a spoon to each with a ribbon, and added a flower. I think they turned out pretty cute!


Here is a closeup of the "Refreshments" banner and the variety of preserves we had. I chose Smucker's because the packaging matched perfectly with the theme.


Each girl in Young Women was assigned a value or theme and asked to decorate a table with what they had done over the year to learn and grow in that area. We had one Senior who was preparing to graduate in the Spring. Her table was about the Young Women program over all and how it helped her learn, grow, and gain a testimony.


Each table was decorated in a value color and the "Young Women" and "Personal Progress" tables were decorated in a light pink.


Each table had a banner stating the value or theme. I made the banners with my Cricut.


The banners were tied to wooden dowels I wrapped with green floral tape.


The dowels were placed in mason jars with flowers in value colors.


I used glass gems in the bottom of each mason jar to weigh it down and hold the flowers and dowels in place.


I also decorated the mason jar lids with a variety of fruit that I cut with my Cricut and then tied them to the jar with gingham ribbon in the appropriate value color. It was a little difficult to find fruits that matched the color of some of the values, but I did it!


Here is a closeup of the pink mason jar lid.


Each table had a white table cloth and then a square of colored fabric to match the value or theme.


I got the gingham paper used on the banner and lids and the gingham ribbon from Hobby Lobby.


I really like how everything turned out! The Bishop spoke on the theme of "Preserving Your Values", a couple of the Young Women spoke about their value and what they had done over the year to learn and grow in that area of their life, and all the Young Women sang, "I Walk By Faith". I love that song because it goes through all of the Young Women values!

This was such a fun theme to plan and decorate for! I hope you enjoyed the ideas I shared!